
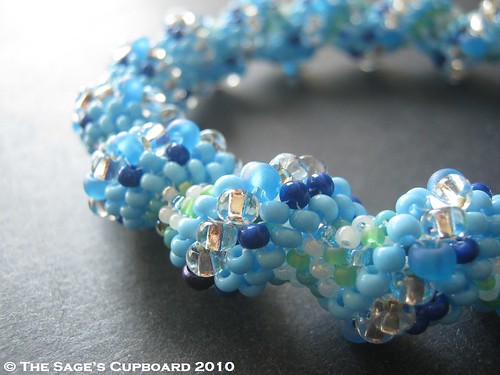
Spiral peyote is one of the most adaptable forms of spiral beadwork. Just by changing the arrangement of the beads, you can create nearly endless looks and patterns.
The technique is simply a variation of tubular peyote, worked best in even-count with a step-up at the end of each row. Using different sizes of seed beads doesn’t so much create a spiral, as accentuate the pattern that already exists in a peyote tube.
To Stitch Spiral Peyote:
The first thing you want to do is determine a pattern for your spiral. You can use almost any combination of seed bead sizes that you want, but it is important to gradually increase the sizes. If you are using 3 or more bead types, you will need to decrease as well, so that the tube can close neatly.
For example, traditional Cellini Spiral begins with 11/o seed beads, then increases to 8/o and 6/o. A final row of 8/o seed beads are needed to close the gap between the 6/o and 11/o bead sizes.

For Cellini Spiral, you would begin with six 11/o, four 8/o, two 6/o and another four 8/o.
Stitch through all of the beads again and pull tight to form a ring. The stop bead is only to help keep the tail thread from slipping back into the beadwork. Stitch through the first TWO of the smallest beads again. You must begin your spiral here, or the first row will not be aligned with the following rows. This step is especially important if you wish to connect the ends of your tube together using the zip-up technique.

Continue adding beads with peyote stitch, working around the ring. With basic spiral peyote, there’s no need to count beads or stitches. Just remember to always pick up the same type of bead that your thread is exiting.
After you have added the last bead of that first peyote row, you will need to step up. Stitch through the first raised bead - also the first bead you picked up in the last round.
Even if you stitch with good tension, the first few rows of tubular peyote can be a bit kinky. Before adding the next row, turn the peyote ring through your fingertips, gently pressing to help snug up the beads and form a neater tube shape.

Using the form will help you to keep even tension during the first few inches of beadwork. You can use anything as a form, and it does not have to have a snug fit. It’s not there to create the tube shape, but to free you from having to grasp the first few rows of beadwork with your fingers. It also helps to keep the tail thread from getting in the way. You can wrap the tail gently around the form, and it should keep itself coiled there.
Hold the mandrel or form against the heel of your hand, and use your thumb to steady the beadwork near the opposite end. Now you can easily rotate the tube to add the next bead.

Once you have a few inches of beadwork, you can remove the spiral tube from the mandrel. Now the beadwork is long enough to be held steady and comfortably without squashing it.
Spiral Peyote Tips:
If you are making a bracelet, it is tempting to try and bend the beadwork to get a curve. Any tubular beadwork will appear very rigid when it is short, but it will become more flexible as you add length. Don’t try to force the beadwork into a curve. When it’s long enough, you will be able to bend it easily.
This is one of very few techniques where highly uniform seed beads can be less desirable. Using Czech seed beads, with their minute size variations, can create a much smoother spiral. As you work, look for beads that will help transition each new size from the previous one.
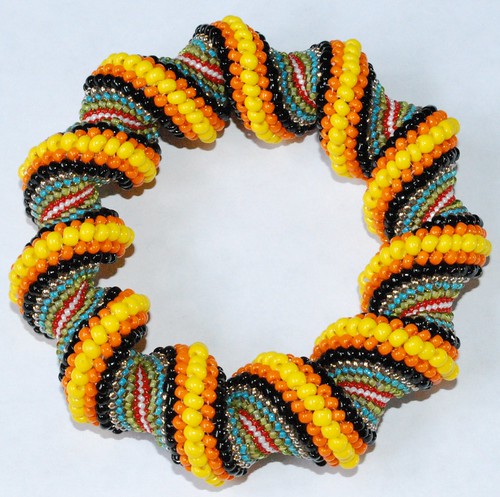
Multicolor Spiral Bracelet
by Pocket Full of Treasures
Share your spiral peyote tips or questions in the comments!
Copyright 2010 Inspirational Beading


I would like to make a necklace using this stitch. I am a beginner. If I wanted to make a length of 16 inches, what materials would I need? thank you, Magda
ReplyDeleteThe amount of beads that you would need depends on the pattern of bead sizes that you are using. If you wanted a 16 inch Cellini Spiral, I would suggest having 20-30 grams of each bead size on hand, or two hanks each. You'll have leftovers, but that's better than running out!
ReplyDeleteThis is awesome -- I bookmarked it. I've only made ONE seed bead creation, but this is the pattern I've most wanted to do.
ReplyDeleteIt's a great stitch! Like bead crochet, you can just sit back and watch the rope grow. Once you get going the steps are so simple.
ReplyDeleteI love seeing all the different size and color patterns that beaders can come up with!
Detailed instructions and helpful pictures - great! Looking forward to getting started!
ReplyDeleteJean - www.beadingprojects.org
I LOVE cellini spirals. I'd make one everyday if I could :o)
ReplyDeleteThank you Sister
ReplyDeleteYou make this look so easy. I may just give it a go. I've been bead weaving since I was 8 but love the idea of these patterns they look so fab. Thank you.
ReplyDeleteHi there, thank you for the great instructions. :-) I am in a pickle though, I have the bracelet the size I need and I want to add a clasp, not zip it up as I have a large wrist. I have tried decreasing but it looks very messy so I think I must be doing it incorrectly. Please could you tell me how to decrease so I can attach a clasp. I have used size 15 x 2 colours, size 11 x 3 colours, size 8 in 2 colours and size 6 in 1 colour.
ReplyDeleteThank you so much
Elizabeth
Hi Elizabeth! Have you tried doing one or more rounds using just your 11/o beads? This will pull the end of the tube together without having a lot of thread showing, and will create a fairly flush edge. If you want a more gradual taper, replace the largest bead from each round with the next smallest size until you're using just 11/o or 15/o. From there it depends on the type of closure you want to use. This tutorial for capping ropes might give you some ideas:
Deletehttp://www.inspirationalbeading.blogspot.com/2013/05/how-to-cap-and-finish-herringbone-ropes.html
Thanks so much Mortira, I tried decreasing with the size 11/0 but when I got around to the 15/0's there was no room for the 11/0 bead to fit. Should I jump over the 15/0's?
ReplyDeleteYou could use both 11/o and 15/o until your tube is as cinched as it can go, or switch to all 15/o once all other sizes are eliminated. It depends on how you want the ends to look when you're finished.
DeleteI've made my first spiral bracelet and it looks terrific but I wanted some advice on how long I should make it if I want to zip it up. I'm assuming it needs to be longer so that you can slip it or roll it over your hand. Are there any guidelines you use to make it the correct length without it getting too big?
ReplyDeleteThe length needed for a bangle will vary depending on the beads that you use, which will change the thickness of the spiral. Your thread and tension will also effect how rigid the beadwork is - a softer bangle should be smaller because it can slip off more easily. You'll need a minimum of 9 inches of beadwork to bring the ends together, and from there you can measure the circumference of the space inside the bangle to find the size you need.
DeleteHi, I have just started with my spiral used one size seed beads. And I have a problem with it – the spiral is still straight. It is quite impossible to round it around hand, it just break and don’t have round shape. I did use seed beads and netted it by nylon string… do I tighten it too much? Can you please help me with it? Thanks, pavla
ReplyDeleteYour tension and thread will both have an effect on how flexible your rope is, although even a very stiff rope will usually curve enough for a bracelet or bangle when it is long enough. The amount of beadwork you need will vary depending on how thick the beadwork is (or how many beads per round). If you find that your rope is still very stiff after 8 inches (20 cm) or more, you could try gently conditioning it in small sections, by carefully and very slightly stretching the beadwork back and forth.
DeleteThank you, I will try do it angain and let you know ;)
Deletehi i need to make a model of dna for an art project and i want to know if i can use different types of beads in this stitch to give the same effect like pearls or glasss beads. please answer asap. thanx in advance. :-)
ReplyDeleteHi! There is actually a beadweaving technique that closely resembles DNA. Using the right combination of colors, you could create a pattern in African Helix stitch that might work for you. It is a trickier stitch to master, and requires Japanese round seed beads (not Delicas) to work correctly. This video tutorial is excellent if you want to give it a try:
Deletehttp://youtu.be/B4m-SXc6EcM
You could also get a fairly good model using spiral peyote if you included two different rows of the largest size bead with a diagonal pattern in between. I would recommend working with 15/o, 11/o and 8/o seed beads. Double spiral or tubular netting (Russian spiral) might work for you as well. You can find instructions for both under the Beading Tutorials tab at the top of the page.
Good luck!